Drumroll, please! Okay, that was unnecessary, but I do feel like celebrating this first post in my 2023 DON’T/DO THIS series. I did a run of these a few years back that were featured on Houzz.com, but I’m older, wiser, and…well, at least older. So here I go again, revisiting, revising, expanding, and enhancing my pocket guides to better lighting.
And there may be no better place to start than a kitchen, the only room in the house where bad lighting can lead to accidentally amputated fingers, and the only room in the house that cannot be solved with floor lamps. Getting lighting right in the kitchen has to be done the first time, or you will likely be stuck with bad lighting for decades to come.
Fair warning: any single blog post that claims to provide everything you need to know about any aspect of lighting is a phony. While I simplify kitchen lighting down to two lists of the most common failures and successes, there are always occasions where these rules will not apply. And there is no substitution for carefully planned, expertly chosen work that accounts for all of the scientific, physiological, psychological, technological, and aesthetic aspects of light.
But sometimes you just need some help getting going in the right direction. I hope this helps.

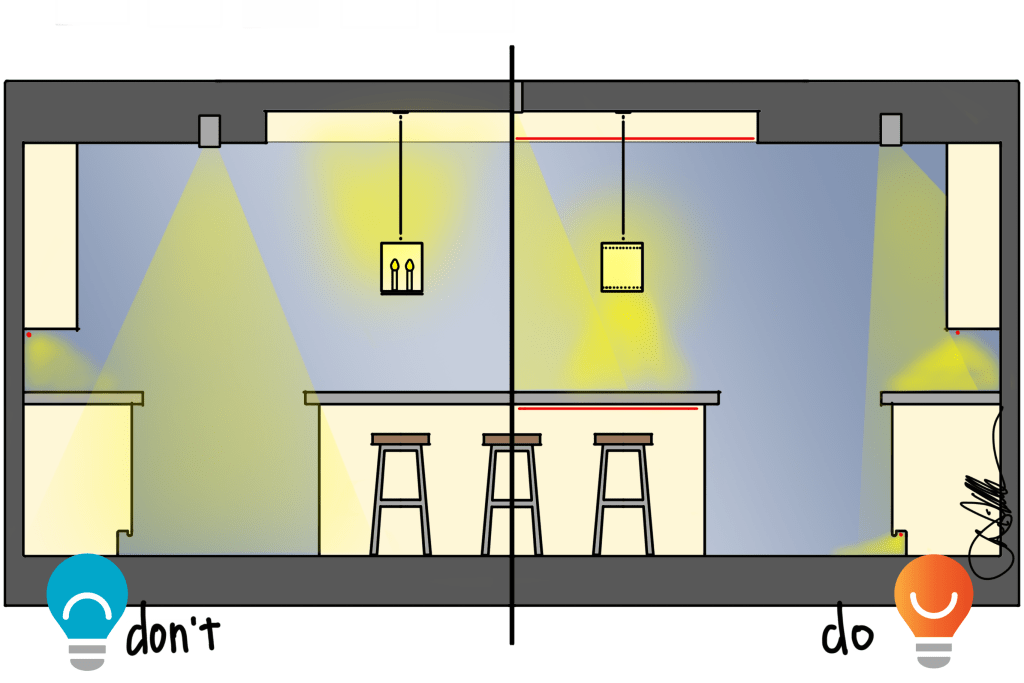
Let’s start with a section view of a sample kitchen that features a central island flanked by cabinets and counters, a ceiling cove (also called a tray ceiling), and decorative pendants over the island.
Here are a few mistakes to avoid:
- Undercabinet light at the back of the counter. This places light where it will do the least good for prep and countertop use and may deliver more glare.
- Recessed downlights over the floor. There is no good reason to light the floor directly and then leave counters and cabinets to fend for themselves. Light over the floor is great for pets and mopping, but terrible for anything a human wants to do in a kitchen.
- Pendants that don’t deliver. Too many islands are illuminated by pendants that do a much better job of lighting the ceiling and looking pretty when they should be providing good light for the countertop. Clear glass or open fixtures can also be the worst source of glare and discomfort, even if it is subconscious.
- Lower-level darkness. We are conditioned to be afraid of the dark and reflexively avoid putting our feet into dark holes. Dark spaces underneath island tops will be far less comfortable and inviting when left dark.
Replacing the Don’ts above with the following Do’s below can go a long way to brightening your kitchen, all while reducing glare and increasing beauty.
- Undercabinet light centered over countertops. Put light where it is needed in the front and middle of the countertop and it will be much easier to prep, cook, and clean. Plus, these lights make for great evening lighting when fixing a snack or drink.
- Recessed downlights over countertops. A good house rule of lighting design is to light the things that need lit…it is surprising how often this is not followed. Place recessed downlights near the counter’s edge and use adjustable downlights that can tilt towards the cabinets. The cabinets get light that makes the kitchen feel brighter and the counter gets much better task lighting.
- Pendants that work. If you can only light your island with pendants, look for those that put more light down towards the counter than in any other direction. Shades of frosted glass or linen-style fabrics can deliver soft, comfortable light on faces and make the kitchen more inviting.
- Lower-level under-bar lighting. Chase away disconcerting darkness with light under bar tops. This layer of light makes a space more comfortable and provides excellent light for moving around after sunset.

Imagine that behind the kitchen island is a wall of cabinets, a few open shelves, and a lovely range and hood. I see kitchens like this over and over, but most of them are lit “the way we’ve always done it,” which is another way of saying “we don’t know a better way so we’ll stick with what no one has complained about yet.”
Here are some mistakes to avoid:
- Misaligned downlights. Downlights will cast scallops on cabinets that can be distracting if they follow no visible logic. Ignore the ceiling geometry – it is the cabinet fronts that matter.
- Open shelves with light in your eyes. Any light above your eyes pointing down will be a potential source of uncomfortable glare.
- Weak range hood lighting. CFM and style are important considerations when buying a range hood, but lighting should not be overlooked. It is very, very difficult to improve lighting underneath a range hood after the fact.
- Lower-level darkness. Dark toe kick areas can deliver the same subconscious discomfort as below an unlit bar top.
- Glass door glare. Too many glass cabinets are illuminated with pucks at the top, probably because it is the easiest solution. But that approach blinds us every time we look up into the cabinet.
Here are a few techniques for getting better lighting:
- Aligned recessed downlights. Line up recessed downlights with the centers or edges of upper cabinets to create a rhythm that adds to the beauty of the millwork rather than distracts.
- Open shelves with indirect light. While indirect light in open shelves will be a little less practical, the results can be glare-free and far more comfortable.
- Range hoods with power. Make sure your range hood solution will deliver plenty of light, ideally from at least four bulbs or high-output LED strips.
- Lower-level lighting. Lighting toe kicks is not just for drama or comfort. Horizontal lines of light at the floor can improve balance and reduce the risk of falls, all while being less sleep disruptive than overhead lights.
- Glare-free glass cabinets. Vertical light on the sides of cabinets can look beautiful and provide terrific functional light. Be sure to put these on a dimmer as too often they are left too bright.
- Illuminated features. A beautiful feature like a custom range hood can be lost in the darkness if not carefully illuminated. In this example, I use an adjustable recessed downlight to highlight the hood.

The final view shows many of the do’s and don’ts listed above, but there are just a few we haven’t covered yet.
Try to avoid these:
- Missed details. Tray ceilings, coffers, and coves all cost money and look great, but leaving them dark robs you of their beauty any time the sun is down.
- Shadowed counters. Puck lights were an amazing tool for countertop lighting, but linear LED strips can deliver a far superior experience.
Do this instead:
- Illuminated details. Light the cove, tray, or coffer with linear strips to reveal the detail. This looks terrific, especially when dimmed low, and has the added benefit of filling in some shadows throughout the kitchen.
- Islands that perform. Consider adding a few recessed downlights over the island, between or around any pendants. These can push useable light to the counter, allowing the pendants to be comfortably dimmed for a more comfortable feeling without sacrificing performance.
- Light on tall cabinets. Pantry cabinets, floor-to-ceiling cabinets, wall-ovens, and paneled refrigerators need light, too. Placing the lights and adjusting them just as the countertop lights are done will lend consistency to the project and provide great light on and in the cabinet.
Whew. This may be the longest post of this series (there may be no other room as complicated as a kitchen). Maybe I should have started with a closet….
There will be more Don’t/Do This posts coming this year; look for the category at right.
Read more about kitchens HERE.

I love the Don’t/Do approach and illustrations. We have changed most of our building plan lighting to follow this crazy approach of not just lighting the floor. ;). Thanks for sharing.
LikeLiked by 1 person
Thank you, Fred! Be careful, the not-just-lighting-the-floor approach may make you a bit of an outsider. 🙂
LikeLike
Really great post! Love your illustrations and comprehensive breakdown.
Thanks!
Jess
LikeLiked by 1 person
Thank you, Jess!
LikeLike
This is invaluable information, thank you! What beam angle would you suggest for recessed downlights?
LikeLike
Tyler, thanks for the comment! The right beam angle is determined by the geometry of the room (mostly ceiling height) and what you are trying to illuminate. For most situations, around 40° will do. Supertall ceilings or small artwork need narrower beams; if you are trying to light an entire room (as opposed to something specific like countertops or art), you may find that wider beam angles like 50-60° work better.
LikeLike
Thank you for the helpful illustrations! How high would you suggest hanging pendants above the island? Our ceiling height is 109″ AFF and island 36″H.
LikeLike
Thank you for commenting! I usually recommend that the bottom of the pendant be just above your eye height when standing at the island.
LikeLike
RE: Light on tall cabinets. Pantry cabinets, floor-to-ceiling cabinets, wall-ovens, and paneled refrigerators
How far should the downlights be placed from these cabinets?
LikeLike
Y, I like to keep the spacing off the face of the cabinets the same whether it is an upper cabinet (over countertop) or a tall cabinet, so that the scallops look the same. So, typically, I like to put fixtures about 6-12″ off the face of the cabinets.
LikeLike
This is great info! Is the recommended 6-12″ from pantry/floor-to-ceilings, fridges assuming a typical recessed light pointing straight down? What about for an adjustable module that has 30° tilt, for example?
LikeLike
Setback can vary based on ceiling height; the higher the ceiling, the greater the setback. 6-12” is good for an 8’ ceiling, but step back to 12” and tilt if there is a soffit (instead of cabinets that touch the ceiling) to avoid hot spots.
LikeLike
David,
This is extremely helpful. How would you place recessed downlights for one wall of a kitchen if there are only bottom cabinets (no uppers). There is a large island directly across from this. Would you still place recessed downlights at edge of countertops? Or, because there are no uppers, directly centered on the counter. Would you still avoid putting recessed downlights over the walk aisle between this wall of bottom cabinets and the island?
Thank!
LikeLike
Andrew, you are on the right track. When there are no upper cabinets above a countertop, I like to center the recessed downlights directly over the counter. So, if it is a standard 24″ deep cabinet against a wall, the downlights would go 12″ from the wall. With downlights over each counter/island, lights over the walkway are typically not needed. Good luck!!
LikeLike
Thanks David! Would a 4″ led w/ 950 lumens be overkill in that context?
In the same kitchen, which has only 8 ft ceilings, I am debating on whether to include pendant(s) over a 4’x10′ central island that also houses the sink and dishwasher, and few bar stools. Given a low ceiling height, and that my wife and I are both tall, I am concerned that pendants might make it feel too cluttered, call attention to lack of symmetry (there’s not great alignment between sink and range hood in background), and look weird given we would have to hang fairly close to ceiling. Would having only recessed over the island be OK? I was thinking of 6 cans evenly spaced (overkill?). And if we nix pendant(s), we would only have recessed cans and toe kick lighting…not too many opportunities for other “layers” that you recommend.
I would plan on dim to warm LED cans as well as toe kick lighting for some ambiance.
Thanks for your help!
LikeLike
Andrew, I think 4″ 950 lumens is just fine, but be sure to put them on dimmers for evenings.
You can certainly light an island without pendants, and six downlights is probably the right number. If you want pendants (for decorative reasons, or for the comfort light they can provide), feel free to think outside the box. I have placed pendants at just one end of islands to keep the view clear, or two pendants with a big gap between for the same reason.
You’ll love the kitchen!
LikeLike
I just found your blog, so many valuable insights! We are renovating a heritage home and would like to avoid recessed lights in the kitchen – do you have any alternative suggestions? Thank you!
LikeLiked by 1 person
Thank you for the kind words! Recessed lights can be a distracting modern touch- of course, few of us want to use an icebox when a refrigerator will do a better job. There are some ways to make recessed lights disappear more- like using tiny mid-in fixtures- but there may be clever ways to hide linear (strip) lighting in millwork that keep the ceiling clean. Feel free to send me a picture and I may have more concrete suggestions.
LikeLike
Oh, what a joy to find this blog! I’ve been agonizing over kitchen light placement for weeks trying to help my parents and this answered almost all of my burning questions. Almost! Can you please share how you would approach the following two scenarios?
#1) How to light the area with a counter cabinet? Base cab is approximately 25”, and the counter cabinet that goes up to the ceiling would be approximately 15” deep.
#2) They have a sink wall with a bank of three windows (sink on center) and we would like to do some kind of small modern flush mounts centered on each of the windows from the ceiling instead of recessed. Is there a golden rule on how far out from the wall in a case like this? No uppers, only windows, so would your advice about no uppers also follow in this case with windows?
Thank you so much. I wish I would have found your blog weeks ago! Best info about lighting a kitchen that I’ve come across and I have been going down a rabbit hole every day searching.
K. Barker
LikeLike
Kimberly, thank you for the kind words. I am delighted to hear that you are finding the information useful.
#1 In that scenario I will often center a recessed light on the upper cabinet door(s) and space it 6-12″ off the front of the cabinet (which could be right over the edge of the countertop).
#2 I usually center them over the countertop/base cabinets, so about 12″ off the wall (and then centered on the windows if sizing makes sense).
Hope that helps!
LikeLike
This is so fabulous. I just wish I found this earlier. Choosing my ligthing postions today. Yikes. Is there a way to send you the floor plan for your blessing?
LikeLike
Thanks for the kind words, Dee. I would be happy to take a quick look at what you’ve drawn up, but will be out of the office most of the afternoon. Email me at david@lightcanhelpyou.com.
LikeLike
I love all of your lighting articles. Has been so helpful and informative. Thanks so much for writing them and for all of your help!!
LikeLiked by 1 person
Thank you for the comment and kindness, Julie! Glad you found them helpful.
LikeLike
David, thank you for sharing your expertise, I’ve gotten a lot from this posting! My question is how to handle spacing of downlights along countertops when the cabinets aren’t all the same size. Due to location of sink, oven cabinet, and cooktop, I have less consistent wall cabinet sizes than your sketch. They range from 30, to 24, 18 (either side of window), and even one 12 (between oven cabinet and range hood). On one side of the sink, there’s the 18, then a 24 angled corner cab, then 30. I am doing under-cabinet lights as well.
I really like the idea of illuminating the cabinets evenly, but am struggling with this placement and achieving even light without bright and irregular overlap spots. 1. In such a case would you really put a light centered on each cabinet, or ignore the door spacing and treat the banks of cabinets as an element instead? 2. In the corner, should I put a light right at the corner or center one on the 30 and one on the 18? Obviously nobody will work in the corner, but at the straight segments right or left of the corner.
LikeLike
Jonathan, thank you for reaching out and sharing about your project. On the side of the sink with 18/Corner/30, I would likely center on the 18 and center on the 30; putting one in the corner would be “extra” and I would cut it if budget did not allow. On the other sides I would treat each cabinet run as a unit if there are multiple, odd-sized cabinets and let go of the dream of perfect scallops on each cabinet front, keeping to perhaps 18-24″ max between downlights. Feel free to send me an email at David at lightcanhelpyou.com with a plan and I will take a closer look.
LikeLike
Hi David! Thanks so much for all the insightful information – the blog you have here is so useful & I refer to your do’s/don’t very often! Are there any issues/things I’d need to change if using a wide beam angle like 110? I am specifically looking at the Phillips Hue 4″ or 6″ downlight…
LikeLike
You are welcome! Wide-angle downlights, say anything over 45-60 degrees, will perform more like a disc or wafer light. I personally avoid these whenever possible outside of closets and utility areas – the light will not “push” very well to countertops, coffee tables, books, etc. If you can find a narrow option, you are likely to be more satisfied.
LikeLike
Thanks so much for the answer & explanation! If I can’t use a more narrow option, is it then better to layout the recessed lights over the walkway instead of over the countertops?
LikeLike
I would still put them over the edge of the countertops, as light will be best directly below them. This could also get light on any upper cabinets/shelves you have.
LikeLiked by 1 person